A few months back, I did something I probably should’ve done years earlier — I searched my own name on Google.
Nothing came up. No author page, no bio, not even a hint that I’d written hundreds of posts across two sites over six years. Meanwhile, a much smaller competitor blog had their writer’s name showing up with a little author card, a photo, and links to their credentials. Same niche, way less content than mine, but their author looked more “real” to Google than I did.
That was the moment I stopped treating author info as an afterthought and actually dug into what “Author SEO” means on WordPress. Turns out I’d been leaving a pretty easy win on the table.
What Author SEO Actually Means (In Plain Terms)
Author SEO is basically making sure Google can clearly tell who wrote your content, what they know about the topic, and why that person should be trusted.
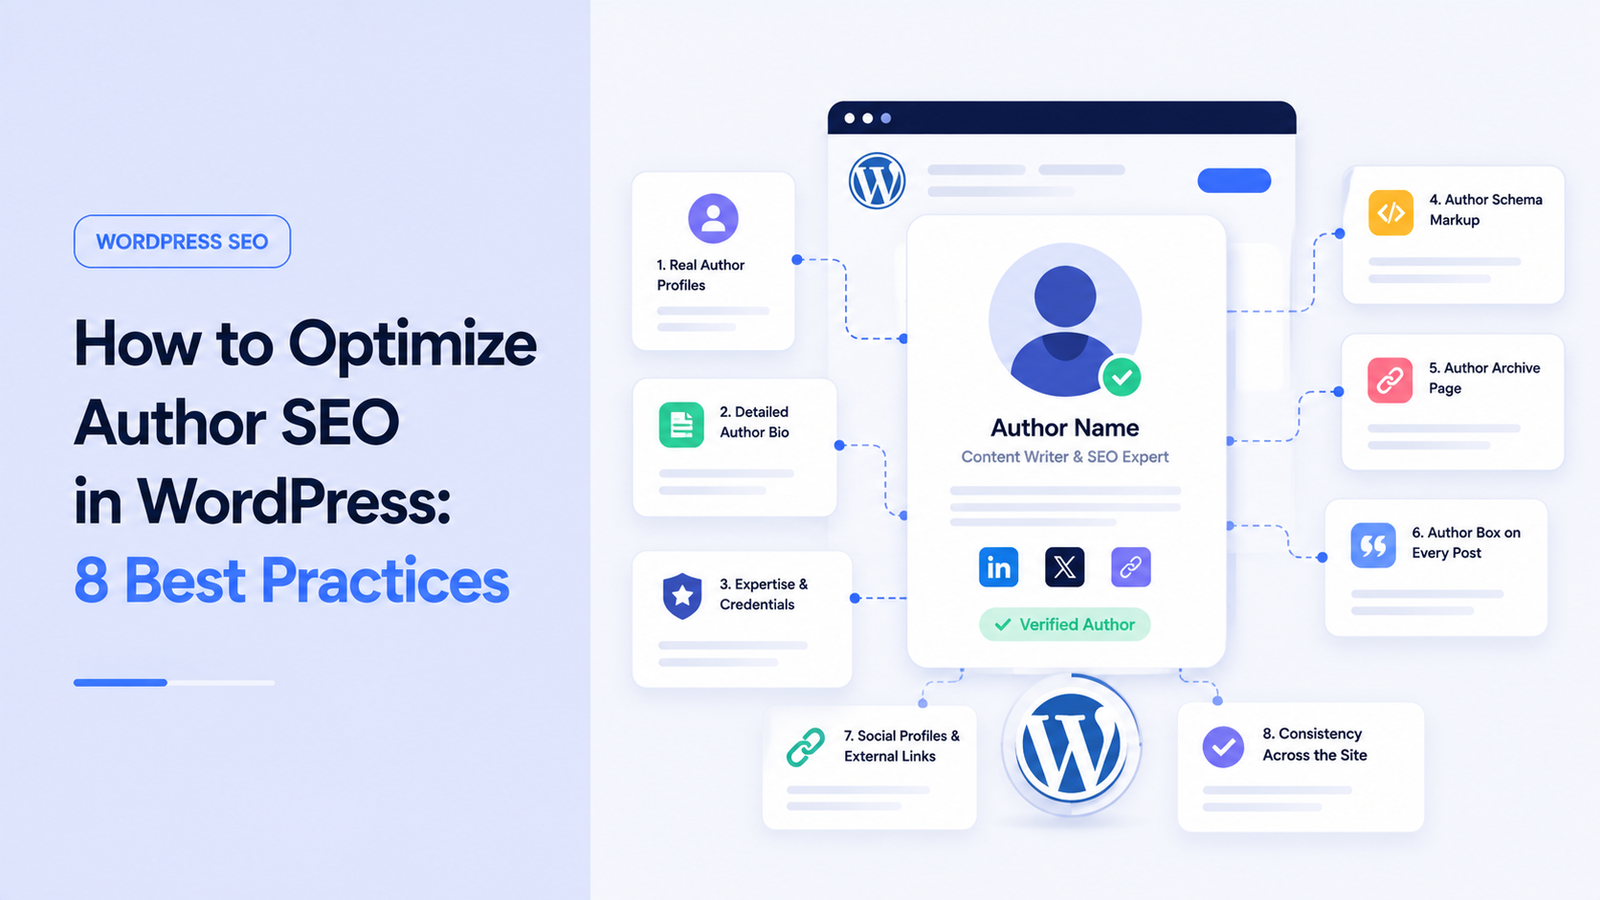
It’s not a plugin. It’s not one setting. It’s a combination of things — your author bio, your author archive page, structured data behind the scenes, and consistency across your whole site.
Think of it like a business card for your writers, except instead of handing it to a person, you’re handing it to a search engine crawler.
Why This Actually Matters Right Now
Here’s the thing that pushed me to fix this. With so much AI-generated content flooding search results, Google has leaned harder into figuring out if there’s an actual accountable human behind a piece of content.
If you’re unfamiliar with how Google evaluates trust, experience, expertise, and authority, read our guide on Google E-E-A-T Explained: How to Build Trust and Rank Higher.
Content that shows up without any visible authorship or experience signal tends to get treated as generic by Google’s quality systems, regardless of how well it’s written. Google’s own quality guidelines talk about Experience and Expertise as part of evaluating trust — and if there’s no identifiable author at all, that part of the evaluation basically has nothing to work with.
For a solo blogger, that’s an easy fix. For a multi-author site, it takes a bit more discipline, but it’s still doable in an afternoon per author.
The Mistakes I Was Making
Looking back, my author setup had basically every rookie problem you can have:
- Every post was published under a generic “Admin” username
- My “About the Author” box (when it existed) said something like “passionate about tech and gadgets” — no credentials, no specifics, nothing
- No author photo, just the default gray WordPress avatar
- No links to any real profile — no LinkedIn, no portfolio, nothing verifiable
- Different spelling of my own name across old posts because I’d changed my display name twice over the years
None of these individually seem like a big deal. Together, they basically told Google (and readers) that nobody in particular was responsible for this content. That’s not a great look when half your niche is now flooded with anonymous AI-drafted posts.
Step-by-Step: How I Fixed My Author Setup
I’m going to walk through exactly what I did, in the order I did it, so you can just copy the process.
Step 1: Give Every Writer a Real WordPress User Account
If you’ve got posts published under “Admin” or a shared account, stop that first. Go to Users > Add New in your WordPress dashboard and create a proper account for each actual writer.
Then, for existing posts, use the Quick Edit option (or bulk edit if you’ve got a lot) to reassign the correct author to each post. This part is tedious if you’ve got years of backlog, but it’s worth doing in batches rather than skipping it.
Step 2: Write a Bio That Actually Says Something
Skip the “coffee-lover and tech enthusiast” line. Google (and readers) respond better to specifics.
Compare these two:
- Generic: “John loves writing about technology and has been blogging for years.”
- Specific: “John has built and sold two WordPress-based niche sites since 2019, and spent three years managing SEO for an e-commerce brand doing $2M+ in annual revenue.”
The second one gives Google something concrete to associate with expertise. It also just reads better to a human.
Go to Users > Profile (or Users > All Users and edit a specific person) and update the Biographical Info field with something real.
Step 3: Add a Real Photo, Not a Stock Avatar
I resisted this for a while because I don’t love having my photo online. But an author with a blank gray avatar reads as anonymous, even with a great bio underneath it.
The easiest fix is setting up a Gravatar account tied to the same email address as your WordPress user profile — it’ll automatically pull your photo in wherever your avatar shows up, including in comments and author boxes.
Step 4: Set Up Author Schema (This Is the Technical Part, But It’s Not Scary)
This is where most people stall out, but it’s genuinely just filling out fields inside your SEO plugin.
If you’re using Rank Math: Go to Rank Math SEO > Titles & Meta > Authors. Fill in the author’s entity type (Person), their details, and social profile links. Rank Math handles turning this into structured Person schema automatically.
If you’re using AIOSEO: AIOSEO has a dedicated Author SEO module (their E-E-A-T addon) under All in One SEO > Users. It gives you structured fields specifically for expertise, credentials, and experience, which then feed directly into the schema markup behind the scenes. This is the most thorough option I’ve tried if you’re managing multiple authors.
If you’re using Yoast: Yoast handles author schema partly through its Local SEO settings and general site representation settings, though it’s less granular than the other two for multi-author setups.
Whichever plugin you use, the point is the same: this structured data (called JSON-LD, if you’re curious) tells Google directly who wrote the piece instead of making it guess from the byline text alone.
Step 5: Turn On (And Customize) Author Archive Pages
By default, WordPress creates an author archive page for every user — it’s just usually ugly and buried. Make sure:
- The archive page is actually linked from your byline (clicking the author name should go somewhere, not nowhere)
- It’s not accidentally set to “noindex” in your SEO plugin settings
- It shows the bio, photo, and a list of their published posts
Check this under your theme customizer or your SEO plugin’s archive settings, depending on your setup.
Step 6: Add an Author Box Under Every Post
If your theme doesn’t already show one, plugins like Simple Author Box or Molongui Author Box add a clean bio card at the end of posts without much setup. AIOSEO and Rank Math also have built-in author box options if you’d rather not add another plugin.
Step 7: Link Out to Verifiable Profiles
Add real, working links to LinkedIn, X/Twitter, or a personal portfolio site inside the author profile fields. This gives Google (and readers) a way to verify the person actually exists and does what the bio claims.
Step 8: Validate Everything With Google’s Rich Results Test
Once you’ve set this up, run your author or post URL through Google’s Rich Results Test tool. It’ll show you whether the Person or Article schema is actually being read correctly, or if something’s missing.
I caught two mistakes this way — one author’s schema wasn’t pulling through because their bio field was empty, and another had a broken social link that was throwing a validation warning.
Unexpected Things That Happened Along the Way
A few things surprised me during this process, some good, some annoying.
- My author archive page started showing up in Search Console within a few weeks, which I hadn’t expected to happen that fast. It wasn’t ranking for anything competitive, but it was getting indexed and picking up small amounts of traffic from people searching my name plus my niche.
- I accidentally had two duplicate author profiles after a site migration a few years back, splitting my post history across two “different” authors in Google’s eyes. I had to manually merge posts under one consistent username.
- Consistency mattered more than I expected. I’d used “John A.” on some old posts and “John Anderson” on newer ones. Once I standardized the name everywhere, the author page felt more coherent, though I can’t say for certain how much that alone affected rankings — it’s one signal among many.
A Few Things I Wouldn’t Bother With
Not everything related to “author SEO” advice online is worth your time:
- Don’t stuff keywords into your bio. “SEO expert, digital marketing expert, blogging expert” reads as spammy, not credible.
- Don’t fake credentials. If Google (or a reader) can’t verify a claim through a linked profile, it can hurt trust more than help it.
- Don’t overthink the author box design. A clean photo, short bio, and working links matter far more than fancy styling.
Quick Checklist If You Want to Do This Today
- Every post assigned to a real, named user account
- Bio includes specific experience or credentials, not generic phrases
- Real photo set up through Gravatar
- Author schema filled out in your SEO plugin (Rank Math, AIOSEO, or Yoast)
- Author archive page indexed, not accidentally noindexed
- Author box visible under posts
- Social/professional links added and working
- Schema validated with Google’s Rich Results Test
- Name spelling consistent across all posts
This isn’t a huge, dramatic overhaul, and it won’t single-handedly fix a ranking problem on its own. But it’s one of those foundational things that’s easy to ignore for years, like I did, until you realize you’ve been publishing content as a ghost. Fixing it just makes everything else you do — content quality, topical authority, all of it — a little more credible in Google’s eyes.